
지금은 거의 대세가 되어버린 Visual Studio Code를 사용하면 그저 내 컴퓨터에 있는 하드드라이브에 있는 파일을 열어 작성할 수 있지만 다른 서버의 파일을 직접 불러와 사용하여 불편함을 좀 더 줄일 수 있습니다.
https://code.visualstudio.com/docs/remote/ssh
Developing on Remote Machines using SSH and Visual Studio Code
Developing on Remote Machines or VMs using Visual Studio Code Remote Development and SSH
code.visualstudio.com
VS Code 공식 홈페이지에 방법이 위와 같이 있고 SSH관련 Extension 설치 후 내가 접근하려는 서버에 SSH 접속을 하면 그쪽의 파일 구조가 추가되는 개념입니다.
(영어지만 크게 어렵지 않은데 OpenSSH 설치가 필요하여 윈도우 10버전이 필요합니다... 제가 7버전을 쓰고 있어서 전부 새로 설치했지요.ㅎ)
저의 경우는 블로그에도 소개한 Pythonanywhere 호스팅 서버에 직접 제 VS Code를 연동하여 굳이 번거롭게 작성한 파일을 매번 업로드할 필요가 없기 위해서였고 Pythonanywhere의 서버에 접속을 시도하였습니다.
(서버는 ssh.pythonanywhere.com 입니다.)
하지만 결과는 에러가 발생했고 이에 대하여 Pythonanywhere 홈페이지 Forum에 이에 대한 문의가 있고 이에 대한 대화가 있었는데 결론은 아직 이에 대한 서버 운영진측이 뚜렷한 답변을 못 내놓은 듯 합니다.
(하지만 운영진들이 정말 진지하고 친절하게 응대해주는 모습은 매우 인상적입니다.)
https://www.pythonanywhere.com/forums/topic/16688/
SSH not working with Visual Studio Code : Forums : PythonAnywhere
Would you like us to update your account so that you're using our new virtualization system, which should support the latest Node? It's in beta, so there might be problems with it, but we're not aware of any problems right now and we're rolling out the bet
www.pythonanywhere.com
하지만 마지막 부분에 누군가가 다른 해결방안을 찾았습니다!
Hey @all, I've been able to use the "Pony SSH" extension to connect to PythonAnywhere and edit/create/delete/etc.. files in my account. So while the standard one still doesn't seem to work, I'm using VS Code successfully at this point.
(포스팅 일자도 올해 8월 12일입니다. 매우 신기합니다.)
방법은 다음과 같습니다.
1. "Pony SSH" VS Code Extension을 설치합니다.
2. F1키를 누르고 검색창에 settings.json 을 입력하고 엔터를 치면 파일이 실행됩니다. 그리고 내가 접속하고자 하는 서버의 정보를 아래와 같이 입력합니다.
{
"tabnine.experimentalAutoImports": true,
"terminal.integrated.automationShell.windows": "",
"terminal.integrated.allowMnemonics": true,
"terminal.integrated.shell.windows": "C:\\WINDOWS\\System32\\cmd.exe",
"workbench.iconTheme": "material-icon-theme",
"ponyssh.hosts" : {
"my-host": {
"host": "ssh.pythonanywhere.com",
"username": "conansjh20",
"password": true
},
}}
다른부분은 원래 있었던 내용이라 무시하고 붉은색 부분을 추가하고 저장합니다. my-host는 내가 저장하고 싶은 이름을 적으면 됩니다. password 부분이 true로 되어있는 것은 나중에 접속시 입력하겠다는 의미입니다.
3. 다시 F1키를 누르고 검색창에 PonySSH를 입력하여 PonySSH: Open Remote Folder를 실행합니다.
그러면 알아서 로그인을 하고 비밀번호를 입력하면...
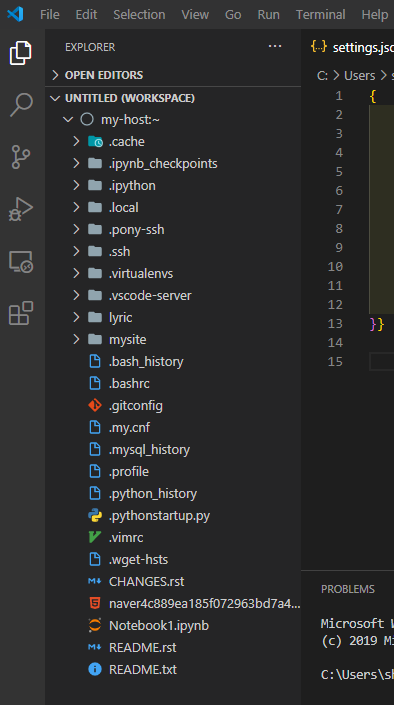
위와 같이 내 Pythonanywhere 서버의 파일들을 그대로 불러오게 됩니다.
씁쓸하지만 결국 검색 능력이 실력의 큰 부분을 차지한다는 점을 깨닫게 되는 순간입니다.